Posts

Cube Twist Fireplace Set

Image
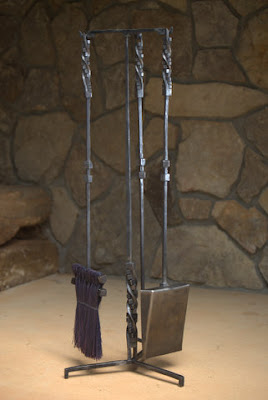
"...awesome and cooler than any I've ever seen..." - The client A client commissioned a set of fireplace tools, after discussing a couple of options they settled on the cube twist as the primary design element. This is the finished product: The Handles I added a slight variation to the cube twists I've regularly seen. I didn't like the look of the ridge between the cubes and the flat, so I made a couple of chisels / flatters to open up the longitudinal groove and flatten it out. This creates a softer look and helps to visually isolate the cubes. Below is is a video (I like this guy, and he does some really good work) on how to make the twist. The photo is the test piece I made, you can see how the ridge between the corners or the bar and the cubes affects the appearance. Harder to see in the photo is that I experimented with taking the corners off the cubes to create semi-pyramid shapes. I didn't like that look for his, but maybe for a future p

2017 ABS Bladesmith Symposium

Image
Pictures of the competition

Kayak cart from a treadmill

Image
I recovered a treadmill that thrown out alongside I-40 and decided to bring it home. I wanted to build a cart to hold my 2 kayak that would roll up underneath my porch and be ease to pull back out again and this looked like a great source of tube steel. I started by cutting it up with an angle grinder and finding the pieces I wanted to use. Having never welded anything before, I started with a 220V 50amp stick welder I borrowed from my neighbor. I quickly found that it couldn't be set it low enough to keep from burning right through the thin metal. So I convinced myself that I could afford to buy a small MIG welder. I bought a Hobart Handler 140 from Tractor Supply. Its a 115V welder and can work on much thinner material. The handle and pull bar attached to the front (left of picture below) were also found along side I40. As was the pipe I have at the top separating the 2 vertical posts. I re-purposed the treadmill arm pads and rubber tread-guides to cushion the kayaks against the

Bird Letter Opener

Image
A friend asked me if I could forge her a letter opener shaped like a bird, I thought about it and decided that casting one would be better. Its aluminum so the blade will wear faster, but its a letter opener not a butcher knife so it will be OK as long as she doesn't open all the junk mail. I started by creating a model in Fusion 360 Then bought some castable wax filament for the 3D printer and printed the model. This process took a LONG time to get the setting close enough to work for me. Then I sanded and cleaned up the print and tried to make a plaster of paris mold. Making the mold worked fine, but melting / burning the wax out caused it to fail… So I printed another one, sanded and cleaned it up, then with the help of Bob Sinclair, we created an investment mold and baked the wax out for 12 hours in his oven… Then melted and poured the aluminum… The result isnt what I hoped for, the surface texture should be smooth. I think this happened because my sprue wasn&

Forged lizard wall hook

Image
I started with a piece of 1/4" x 1-1/2" x 10" bar and and idea about making a lizard wall hook. I really wasn't sure about this one until the end when I twisted the body and gave it some life. During the whole forging process, it felt flat and lifeless, then I bent the body as if it were walking and the rest is history. The finished length is about 13".

Forged Sea Turtle hinges

Image
My first forging project, a pair of hinges shaped like sea turtles for my deck gate. Not perfect, but I was very happy with the result. And as a bonus, they actually work as hinges! They've been installed on my gate for a couple months now, they work well and look good.

Turkey Quill Pens

Image
We have some wild turkeys that come through the property on a daily basis, one day I counted as many as 68 turkeys pecking and scratching around. When they would leave for the day to find other food, they frequently left behind feathers (and lots of other stuff). I started picking them up because they were just so cool looking. Lots of iridescent colors, different sizes and shapes. When I had 30 or so feathers, and kept finding more every couple of days, I realized I needed to actually do something with them. I took me another week or two to get the idea of quill pens. After some Googling and YouTubing I found instructions for cutting the quills. I made a few pens and bought some ink from the craft store. Making the pens turned out to be the easy part, it only take a few minutes to make each one. The hard part was re-learning to cursive script. I scribble down short reminders on scrap paper, but I hadn't hand written multiple, complete sentences and formed paragraphs in