Cube Twist Fireplace Set
"...awesome and cooler than any I've ever seen..." - The client
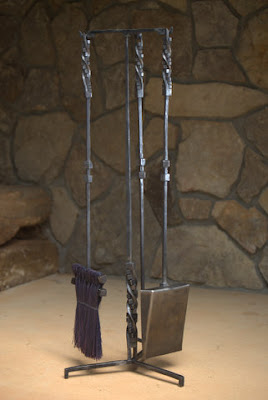
A client commissioned a set of fireplace tools, after discussing a couple of options they settled on the cube twist as the primary design element. This is the finished product:
The Handles

I added a slight variation to the cube twists I've regularly seen. I didn't like the look of the ridge between the cubes and the flat, so I made a couple of chisels / flatters to open up the longitudinal groove and flatten it out. This creates a softer look and helps to visually isolate the cubes. Below is is a video (I like this guy, and he does some really good work) on how to make the twist. The photo is the test piece I made, you can see how the ridge between the corners or the bar and the cubes affects the appearance. Harder to see in the photo is that I experimented with taking the corners off the cubes to create semi-pyramid shapes. I didn't like that look for his, but maybe for a future project.
The Shafts
I forged the 3/4" handles down to 3/8" square for the shafts and added 2 - 3/4" cubes to the to break up the length. I twisted the cubes so their faces were not in plane with the rest of the shaft. I left a 3/4" space between them.
The Broom
The broom consists of 2 horizontal 1/4" dia rods drifted into the shaft. The ends of the rods are capped with 3/4" cubes to repeat the similar element in the shaft. I choose to go with a darker straw, I didn't feel the normal yellow straw would have the same impact. The broom straw was added by broom maker Marlow Gates (Friendswood Brooms, Facebook), he did an amazing job.
The Shovel
I used a single 3/4' cube to create the connection between the shaft and the shovel pan. The sides of the pan flare out at about 45 degrees and the back slopes forward at about 15.I etched my logo into the back of the pan with a battery charger and salt water.
The Poker
The poker is a simple "L" shaped type. I offset between the shaft and the working end to creates a 3/4" x 3/4" square similar to the 3/4" cube on the shovel.The Stand
The main element of the stand is a 1" square bar cube twist near the bottom. Where the twist meets the base legs, I created an open rectangle similar to the tops of the tools. On top of the twist is a 1/2" square bar that tapers to 3/8" square to meet a 3/4" cube that joins the tools support arms.
I repeated the same design concept as the poker and used the offset to create another 3/4" square. The ends of the arms resemble stubby versions of the poker.
Lessons Learned
- Measure twice and cut once. And, then, try to fix it so it still works.
- If you say "No" to a challenge, you'll never know if you can conquer it.
- The easy looking things can take much more time than the hard looking things.
- Start with a good concept, but finish with a good product.


Comments
Post a Comment